Page 11: Wireless (TCP/IP) Functions
Standard Wireless Server and Client System
Mobile Data Studio enables projects to be installed and sessions with data to be transferred 'wirelessly' via transmission media that support the common TCP/IP standard. TCP/IP is also used by the Internet and networks, including mobile phone networks, wireless LANs (Local Area Networks) and WANs (Wide Area Networks). Android and Apple Smartphones and Tablets, and Windows 10 Tablet devices are equiped for TCP/IP communications, both via mobile phone networks and WiFi. Mobile Data Studio 10 provides MDS Cloud Relay for effective communication where standard network options are either inconvenient or not available.
| The Mobile Data Studio TCP/IP system is based on the Mobile Data Studio wireless server (istalled on a Windows desktop PC or Windows server) and Mobile Data wireless client functions. TCP/IP is the only mode of connection for Android and Apple iOS devices; generally via the mobile phone network or WiFi, though Tethering via USB cable and WiFi Hotspot can be used (see bottom of page). Windows 10 Tablets are equipped for WiFi, and may also connect via data networks. The TCP/IP wireless connectivity is simple to set up and run, either on a Windows desktop PC or Windows enterprise server. | 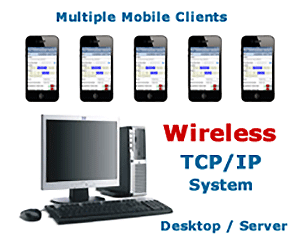 |
 |
Consider using MDS Cloud Relay to connect MDS Server and android devices, see Skills page 10.
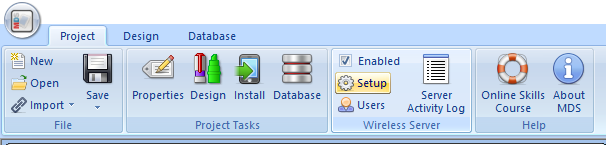
To configure Mobile Data Studio Wireles Server on desktop PC for standard wireless communication:
- With any firewall protecting network security, enable Mobile Data Studio as an 'allowed program'. Via Windows Settings search for 'Firewall' and 'Allow programs (or app) to communicate through Windows Firewall.
- With either the Project or Database panel open select the Setup option for the Wireless Server section shown below to view Mobile Data Studio Settings below.
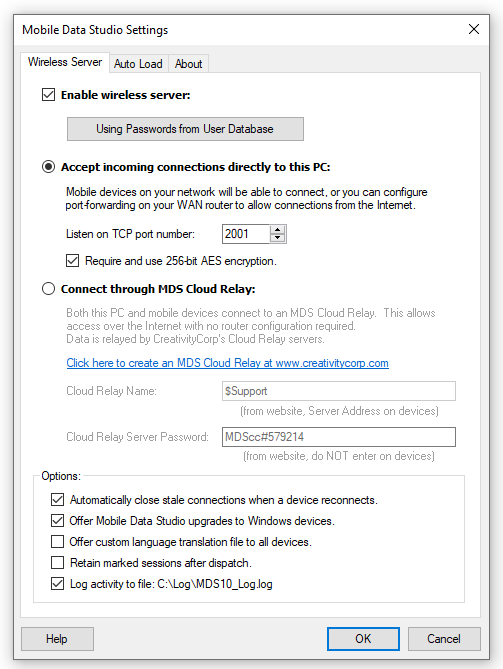
- Check the Enable wireless server option.
- For convenience, select 'Using Passwords from User Database, which manages device Unit ID and Passwords (see Skills page 2).
- Offer Mobile Data Studio upgrades applies to Windows 10 Tablet clients will automatically offer Windows 10 Tablet clients any upgrade to Mobile Data Studio on the server relative to the client. Android and Apple iOS clients upgrade from the Google Play Store and Apple App Store.
- Offer language translation file function allows a language translation file, and any updates to it, to be distributed automatically. The ClientLanguage.ini file is found in C:\Program Files (X86) \Mobile Data Studio and can be edited in Notepad. When the language translation is accepted by the client, the translation of menus will be available when Mobile Data Studio is next opened. See translation information on page 7 for Android, page 8 for Apple iOS and page 9 for Windows 10 Tablets.
- Retain marked sessions after dispatch enables retention of a copy of marked sessions in the Database.
- Port Number is usually the default 2001. However, it can be set to other ports. If a wireless router is used for Internet access, port forwarding to 2001 may be required.
- Require Password to enable access by mobile client devices to Mobile Data Studio server. For maximum security of data transfer, check Require and use 256-bit AES encryption and enter a ten character password of your choice; the password is character and case sensitive.
- Logging enables a text file record of the TCP/IP communications and is important for enterprise deployments and to record and identify any issues that may arise.
 |
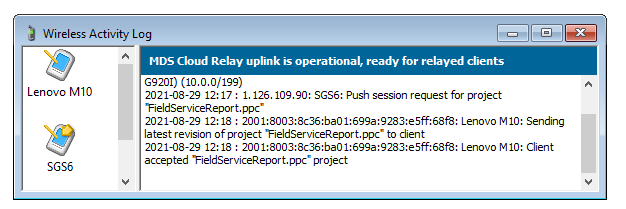
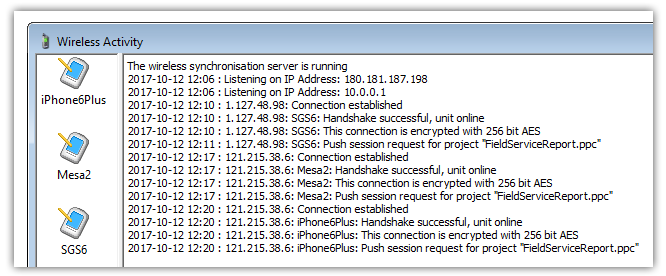
Open the Server Activity Log in the control panel for the Wireless Server to show the Wireless Activity window and 'Listening on IP Address:', see image below, to determine the IP Address to be matched up in Settings in Mobile Data Studio on mobile client device. There may be two IP Addresses shown, for WiFi local area network and for connectivity with mobile phone network via the Internet.
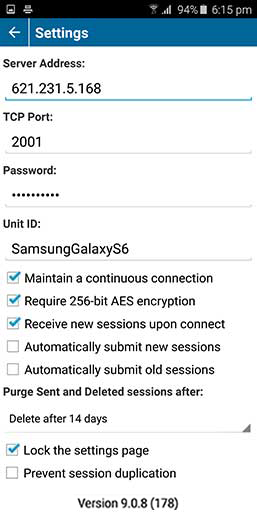
Then, on each Smartphone or Tablet client device to be used (with Mobile Data already installed) corresponding settings are made. For Android, Apple iOS and Windows 10 devices use the Settings menu described on pages of Skills for Android , Apple iOS and Windows 10 devices.
 |
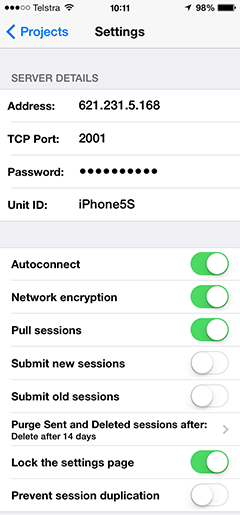 |
| Android Settings. | Apple iOS Settings. |
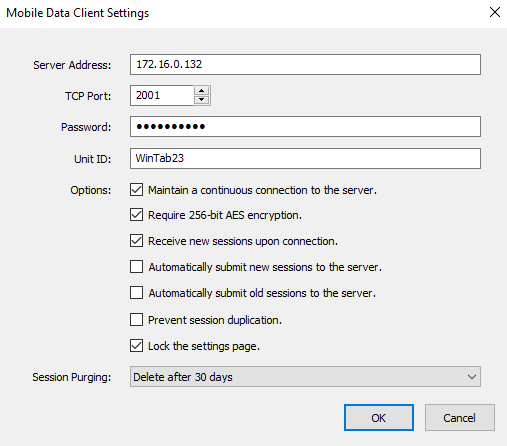 |
| Windows 10 Settings. |
The wireless system is then ready to go and Settings will be retained ; to re-connect either tap 'Connect' or check 'Connect to a server:' and 'OK'.
Synchronising by Wireless
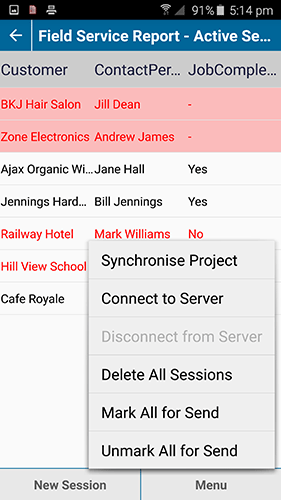
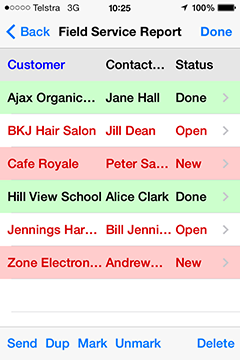
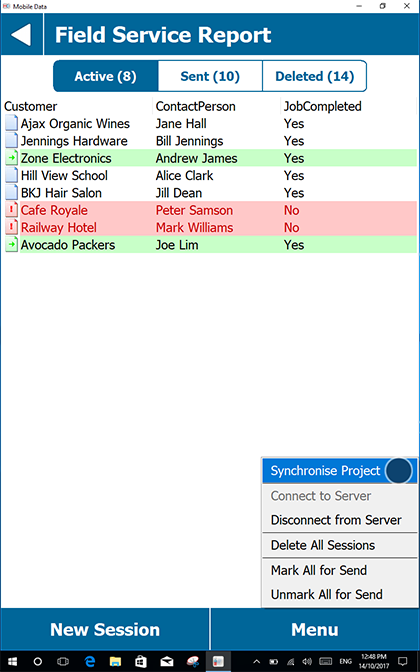
Synchronising involves transmitting all Marked sessions within one or more projects to the Mobile Data Studio server.
To Mark a session or sessions, select and hold the session in the mobile device session list screen, and select Mark for Send from the menu, a marked session will appear green. This menu can also be accessed via the command bar after selecting a session.
To send a marked session or sessions, select Synchronise to transmit to the server. The remaining unmarked sessions will not be transmitted, and will remain on the mobile device. Sessions, can also be sent to server via the Send Now control in the session list menu. Wireless synchronisation removes from Mobile Data all of the particular project sessions that are Marked for Send. Thereafter, the project session data are managed from Mobile Data Studio on the Windows desktop PC or server , but can be sent back to the Mobile Data client if required. Please note with Android, Apple iOS and Windows 10 there are folders for Active, Sent and Deleted Sessions.
 |
 |
| Android Session Menu. | Apple iOS Session Menu. |
 |
|
| Windows 10 Session Menu. |
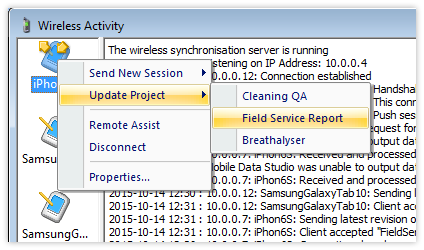
A Log View option in the Wireless Server menu in Mobile Data Studio server displays a Wireless Activity window (see below). The Wireless Activity window shows the IP Address or Addresses the Wireless Server is listening on; for some hosts, there may be two addresses shown for both the 'external' Internet related network address and the 'internal' WiFi address. The Internet related address is relevant to mobile devices connecting via the 4G/3G/5G mobile phone network, the internal WiFi address is relevant to connections within the same building. The Wireless Activity window shows the mobile devices that are available to communicate with and allows easy monitoring of wireless events such as incoming connections and synchronisation progress. Sessions are uniquely identified by GUID (Globally Unique Identifier) to track dispatches and acceptances by the Mobile Data Studio server and Mobile Data clients. The Wireless Activity window also displays transactions for wireless project installation and update and Unit ID changes, and can also be helpful to resolve problems if they occur.
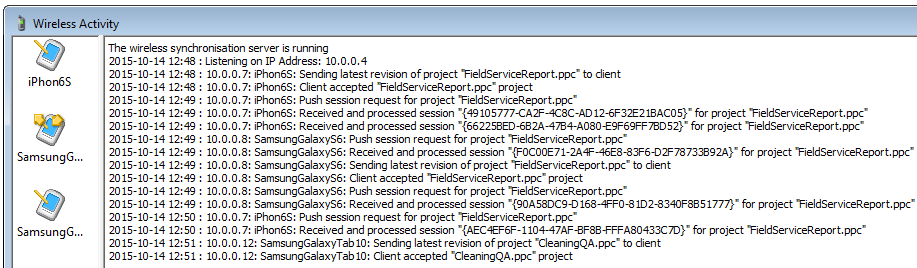
The wireless activity shown in the Wireless Activity window can be written to a text Log File by selecting Logging from the Setup menu and opening an appropriate file. The log file will continue to operate even if the Wireless Activity window is not open. Maintaining a Log File can be important for tracking session traffic when managing a large mobile deployment. An example text Log record is:
2017-8-20 21:14 : 127.0.0.1: Courier1: Sending latest revision of project "Courier.ppc" to client2017-8-20 21:14 : 127.0.0.1: Courier1: Client accepted "Courier.ppc" project
2017-8-20 21:33 : 192.168.0.234: Courier3: Sending session "{24B67E52-2CB9-44B2-A5C5-6D4B6CE243F7}" for project "Courier.ppc"
2017-8-20 21:33 : 192.168.0.234: Courier3: Client accepted session "{24B67E52-2CB9-44B2-A5C5-6D4B6CE243F7}" for project "Courier.ppc"
2017-8-20 21:33 : 127.0.0.1: Courier1: Push session request for project "Courier.ppc"
2017-8-20 21:33 : 127.0.0.1: Courier1: Received and processed session "{90D4495B-6848-4B48-B25C-122BAA720F19}" for project "Courier.ppc"
2017-8-20 21:36 : 127.0.0.1: Courier1: Connection closed
2017-8-20 21:36 : 127.0.0.1: Connection established
2017-8-20 21:36 : 127.0.0.1: Courier1: Handshake successful, unit online
2017-8-20 21:36 : 127.0.0.1: Courier1: This connection is encrypted with 256 bit AES
2017-8-20 21:43 : 192.168.0.234: Courier3: Sending session "{F2D1392C-577F-4BF9-9156-0B37B49D9022}" for project "Courier.ppc"
2017-8-20 21:43 : 192.168.0.234: Courier3: Sending session "{CED733C3-09E8-443A-9AD9-F393F22ACAA5}" for project "Courier.ppc"
2017-8-20 21:43 : 192.168.0.234: Courier3: Client accepted session "{F2D1392C-577F-4BF9-9156-0B37B49D9022}" for project "Courier.ppc"
2017-8-20 21:43 : 192.168.0.234: Courier3: Client accepted session "{CED733C3-09E8-443A-9AD9-F393F22ACAA5}"for project "Courier.ppc"
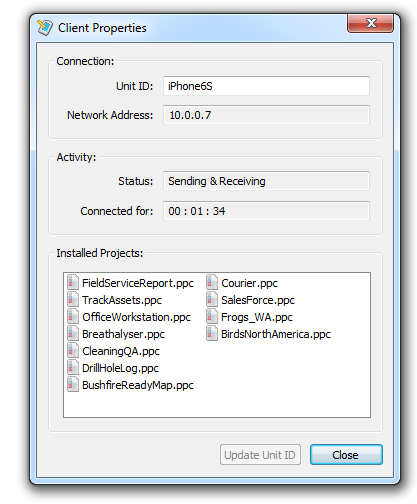
See images below. After selection of Mobile Data clients in the Wireless Activity window, use the right click functions of the mouse to Send New Session and Update Project or install a project. Properties displays features of the client mobile device, including duration connected. An Update Unit ID function enables Unit ID to be remotely amended from the Mobile Data Studio server, which can be useful for large wireless deployments if the user of the mobile device changes. The Installed projects window displays the projects installed on the selected mobile client device.
 |
 |
Sending information to Mobile Data clients Wirelessly
Mobile Data Studio has powerful wireless functions to send information to Mobile Data clients in the field, as projects, updated projects, and sessions. Both text and images can be dispatched to mobile devices, providing many opportunities for field applications:
-
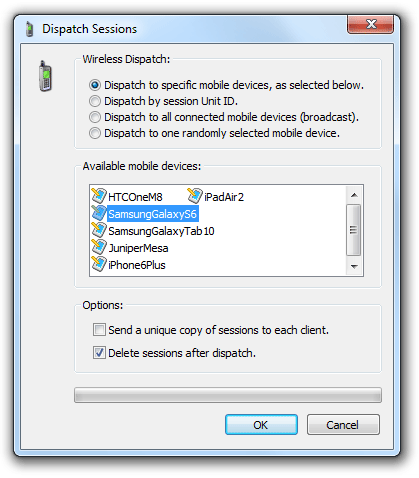
Dispatch Sessions: Local sessions can be initiated on the Mobile Data Studio server (see Project Properties page 2) and sent direct to connected mobile clients, see 'Dispatch Sessions' window below. Send new sessions to Mobile Data clients in the field, for example client information, product stocks, maintenance records.
-
Local Marked Sessions: sessions can be initiated as Local sessions on the Mobile Data Studio server and be saved to the Data Window in Marked for Send mode, queued awaiting connection by Mobile Data clients with matching Unit ID (see Database Window and Data Management page 12). When a specific mobile device synchronises with or sends sessions to the Mobile Data Studio server, sessions Marked for that Mobile Data client Unit ID will be pushed to it. Marking of sessions can be done when saving a Local Session with a specified Target Unit ID.
-
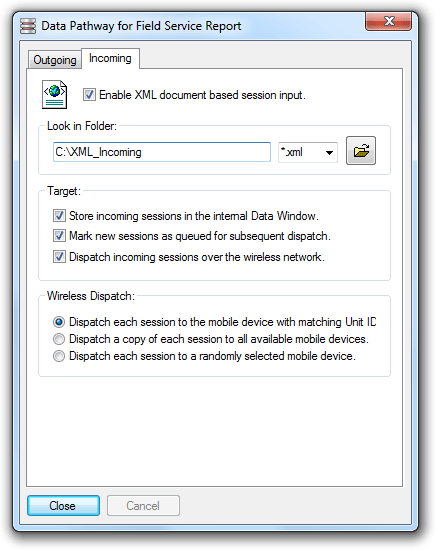
XML Incoming: the preferred method for dispatch of sessions wirelessly in large enterprises is to form sessions in XML external to Mobile Data Studio and import the sessions via XML Incoming (see Data Management page 13); the sessions can be immediately dispatched to connected mobile clients or queued awaiting connection of clients with matching Unit ID.
-
Wireless Activity window: select an icon for a Mobile Data client device and use the right click functions of the mouse to update or install a project and send new session.
 |
 |
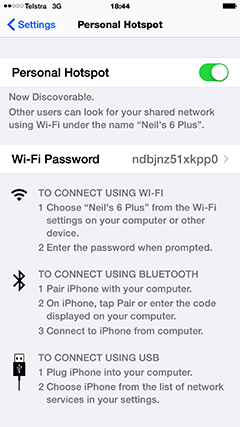
Tethering and Hotspot in Android and Apple iOS
While the standard Mobile Data Studio deployment using wireless TCP/IP is used for multiple mobile clients to connect to Mobile Data Studio server, a TCP/IP connection can be made using the 'Tethering' and 'Hotspot' functions in Android and Apple iOS, see screenshots below. These communications can be useful when Mobile Data Studio is deployed in remote areas away from mobile phone networks. Tethering is conducted using the USB cable provided with Android and Apple iOS devices. For Tethering in Apple iOS, iTunes should be installed on the computer to which Mobile Data Studio is installed. The appropriate IP address will be shown in the wireless Activity Monitor. With use of the wireless Hotspot functions, the mobile device is providing the WiFi network to which is connected a laptop or notebook computer hosting Mobile Data Studio server. When using these functions, either USB or WiFi should be used, not both at the same time.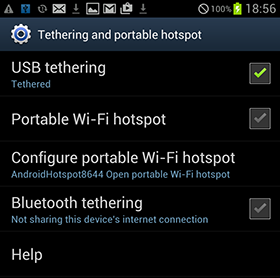 |
 |
Mobile Data Studio in the 'Cloud'
Some Mobile Data Studio users may prefer to utilise the powerful wireless TCP/IP communications of Mobile Data Studio with the server side securely hosted outside the office in the 'Cloud'. Such a 'Cloud' hosted Mobile Data Studio deployment is shown diagramatically below based on customised services provided by WebFrog Consulting.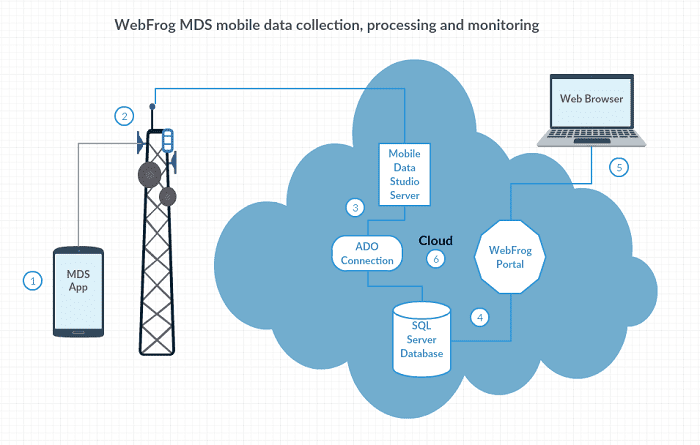 |
- The mobile user enters data into Mobile Data Studio project on smartphone or tablet.
- Mobile user connects and uploads data to the hosted Mobile Data Studio server.
- Mobile Data Studio server receives the session data and automatically sends the data to the connected database.
- The WebFrog Portal data engine automatically processes the incoming Mobile Data Studio data.
- User logs into the secure customised website portal and views/manages the data.
- The entire process within the 'Cloud' is automated which allows for real-time access from mobile device to Web.
 Previous Page Previous Page
|
Jump to page: |
Next Page 
|